


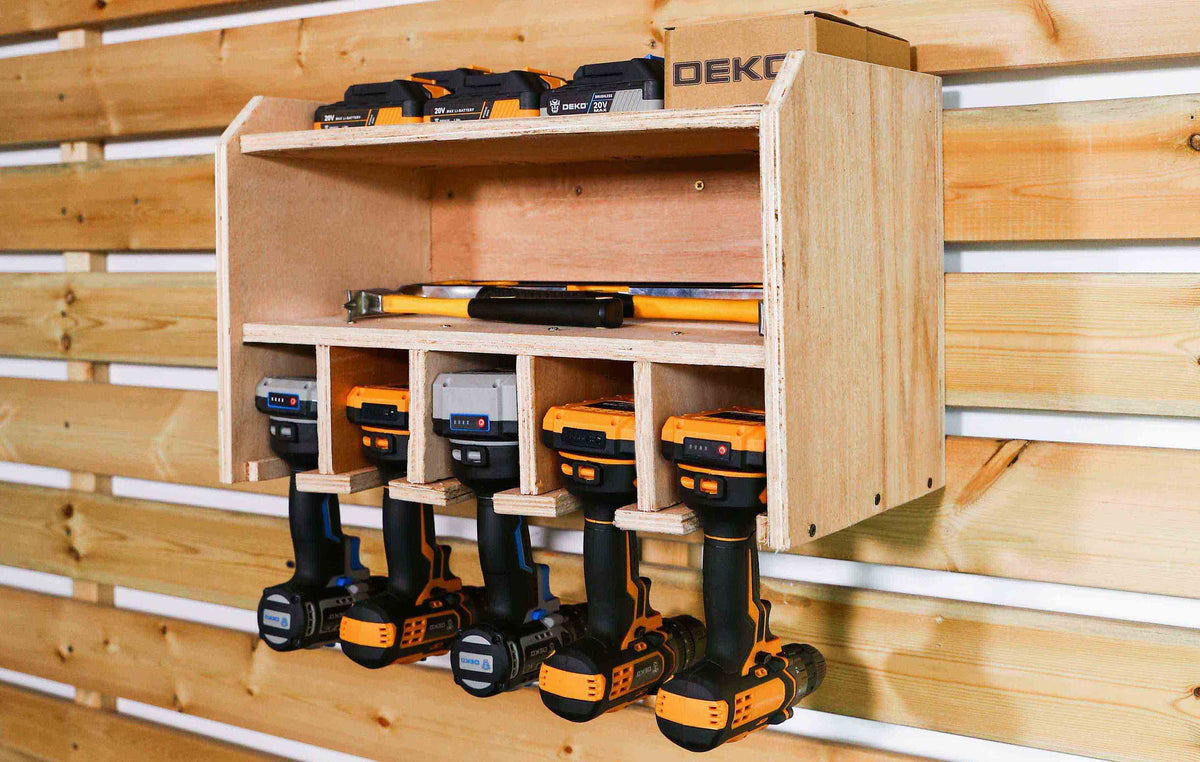
How to Make an Easy Drill Charging Station


Gather Materials and Cut Wood
To start this project, you'll need to gather your tools, including
Measuring tape
inside DEKO 168 pcs Toolbox
1
pc
Circular saw
DEKO DKCS1600
1
pc
Wood glue
no special requirements
1
bottle
Drill and drill bits
inside DKMD99
1
pc
Countersink set
inside DKMD99
1
pc
Orbit sander
DKSD125J1
1
pc
Assorted wood screws
according to the thickness of the board
1
box
Power strip
European plug applicable
1
pc
Quick action clamps
DKQBC06/12/18
4
pcs
Wood board
50cm x 50cm x 1.5cm
5
pcs
Next, use a circular saw to cut wood into the following sizes:
Board (A)
23.5 cm x 47 cm
2
pcs
Board (B)
25 cm x 31 cm
2
pcs
Board (C)
23.5cm x 10 cm
4
pcs
Board (D)
23.5 cm x 5.5 cm
4
pcs
Board (E)
23.5 cm x 2 cm
2
pcs
Board (F)
50 cm x 31cm
1
pc
The thickness of the boards should be greater than 1.5cm. Plywood is not recommended to be used in this project.


①Sand All Wood Boards
Use an orbit sander to sand all sides and edges of wood boards to make them smooth

②Drill Pocket Holes
Drill oblique pilot holes with countersinks to end of (A) and (B) boards.

③Attach Side Boards to The Back Board
Using wood screws, screw a (B) board to the (F) board (hole side faces inward). Repeat and attach (B) board to remaining (F) board to attach lower shelf to sides.

④Attach Lower Shelf
Using wood screws, screw a (A) board to the (F) board around 10cm from the bottom (hole side down).
⑤Attach "T" Supports
“T” supports hold drills and other equipment in place on the drill station.
- Use wood glue to attach a (C) board to the lower shelf (A) board and use a quick action clamp to fix it. Drill pilot holes with countersinks to mark screw placement. When the glue is in place and then secure with wood screws. Wipe away excess glue.
- Glue a (D) board to the (C) board and use a quick action clamp to fix it. Drill pilot holes with countersinks to mark screw placement. When the glue is in place and then secure with wood screws. Wipe away excess glue.
- Repeat four times to make four “T” supports.
⑥Attach Bottom Feet Supports
Bottom feet supports stablize the drill station so that it stands without wobbling.
- Glue a (E) board against the bottom edge of an (B) board so that it aligns flush to the outside edge of the (B) board. use a quick action clamp to fix it. Drill pilot holes with countersinks to mark screw placement. When the glue is in place and then secure with wood screws. Wipe away excess glue.
- Repeat for the other side.


⑦Attach Higher Shelf
Using wood screws, screw another (A) board to the (F) board around 10cm from the lower shelf (hole side down).
⑧Sand the Surface Again
Use an orbit sander to sand the surface of the charging station to make it smooth


Links of tools
YouTube
For more details of how to make a DIY charing station, you can click the button below to watch the original video.
Watch Video